Friday, 9 October 2015

Salted Caramel Cupcakes

Colder days and longer nights can only mean one thing, it's Autumn! This is the time of year where all of my favourite things come into their own: cinnamon, orange leaves and of course, salted caramel. 

This recipe makes 12 salted caramel cupcakes that are to-die-for.

For the cupcake itself...

Ingredients
70g salted butter (partially melted)
170g plain flour
250g caster sugar
50g cocoa powder
1tbsp baking powder
A pinch of salt
210ml milk 
2 eggs

Method
Pre-heat your oven to 180 degrees C
Combine all the ingredients and whisk until smooth.
Pop into 12 cupcake cases, they should fill 3/4 of each case.
Put in the oven and cook for 22 minutes

For the frosting...
670g icing sugar
210g salted butter (partially melted)
70ml milk
30g tinned caramel 
Crushed sea salt

Method
Combine the icing sugar, butter and milk until smooth.
Then add in the tinned caramel until smooth and even in colour.

For the filling...
100g tinned caramel

Method
Once the cupcakes are completely cooled take a knife and cut a hollow out of each cupcake (much like how fairy cakes are cut).
Keep the cut out 'top' of the cake.
In the hollow, put about a teaspoon of caramel into each cake.
Place the 'top' back on and repeat for all the cupcakes.
Once complete it's time to ice the cupcakes, just scoop on a generous amount of icing and decorate as you wish.
Sprinkle the sea salt on top to finish.

Note: I decided to use some of the extra caramel I had left over and drizzle it on top to give it a little something 'extra'.




Saturday, 12 September 2015

MAC Rebel & A Neutral Eye

 Summer is officially ending and the season of bold lips is beginning. To start this season off the right way I've decided to take the 'go hard or go home' approach to lipstick starting with Mac's Lipstick in the shade Rebel.

For the face...
To keep it nice and minimalistic looking I used Maybelline Fit Me Foundation in shade 110. A quick under the eye conceal with the Collection Lasting Perfection Concealer in shade Fair. A touch of pressed powder across my T-Zone using Rimmel Stay Matte and finally a hint of warmth into my ever pale skin using the Rimmel Natural Bronzer.

For the eyes...
I decided to add a little cat eye to this look to help bring it all together using a normal black liquid eyeliner followed by a mixture of mascara to bring some detail to the eyes.

For the lips...
Rebel Mac lipstick applied liberally all over. I should note that this lipstick bleeds quite a bit and would be best paired with a lipliner in a similar shade to ensure that crisp line.


Wednesday, 9 September 2015

Gym Gear - Nike & Asics

My second year at university was roughly spent doing four things; laying in bed, going to lectures, eating and watching Netflix. It was not spent working my bum off in the gym. 

Third year has rolled (literally) around and I've decided that enough is enough. The little pouch I have gained has got to go, he's no longer welcome. 

To get things started with a bang my mum and I popped into Nike and decided to upgrade my old gym gear with some welcome new additions that would motivate me to get fit. I've now had these items for a couple months and can now tell you how I feel they work in the gym and if they're worth investing in.

Let's talk about trainers...


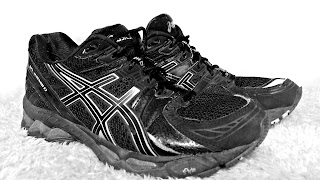
My golden oldies. These are a pair of Asics Gel Kayano 17s. They no longer sell these exact shoes but they do have an updated version that you can have a peak at here. I've had these running shoes for nearly 5 years. 5 years is a long time for a pair of running shoes. The vast reason why they've lasted this long is that they weren't used a whole lot for the first 4 years (guilty). 

The only way to describe them is to imagine running on clouds. Soft, fluffy but firm in the right places. They allow your foot to push down as you run and spring back up as you move. They provide a snug fit that holds your foot ensuring you don't turn over your ankle and go flying. If you're an outdoor runner I highly recommend them, especially if you're worried about your joints!


 The Nike Free Cross Bionic 2 Training shoes are ah-mazing. My parents love the idea of bare-foot training which persuaded me to try out this pair of trainers and holy-hell do I love them. They feel like you're exercising barefoot. That sounds slightly worrying if you're running over gravel but I've used these inside a gym as well as out and about and yes, I'll admit you can feel more of the ground it isn't painful at all. 

The visible cables help to fit the shoe to the shape of your foot like no other trainer I've ever had before. The trainers come with a sock-like interior which fits snuggly and ensures no rubbing occurs during your workout. The fact they're thin and not 'clumpy' feeling is helpful when working out on machines in the gym. You can feel the pedal as you're cycling on the bike, you can feel the treadmill conveyor beneath your feet and you can feel the yoga matt beneath you. 

If you're a gym bunny or someone getting into gym life that isn't vastly interested in running outside I highly, highly recommend these trainers!

Now onto the clothes...

Invest in exercise gear. Yes, leggings and old t-shirts work if you can't afford to buy the real things but exercise gear doesn't have to be branded. If you live in the UK Tesco/Asda do great exercise clothes for a fraction of the price of Nike.


Nike Pro Training Capris, Nike Free Cross Bionic 2 Training shoes, unbranded sports bra, simple black vest top.


A simple pink vesty top and a pair of Nike Training Tights.


Getting fit isn't always about losing weight, it can be about running a half marathon, being able to walk up a flight of stairs without becoming out of breath. Whatever your reason is for getting fit, stick with it and keep going! 


Sunday, 6 September 2015

Boots Cucumber Skincare

Skincare is something that my mum (and dad) have drilled into me since I started wearing makeup. I'm an absolute fanatic about removing all my makeup and ensuring that my skin is squeaky clean before I go to bed and as soon as I wake up. Due to having very sensitive skin I've tried hundreds and hundreds of products that claim to be 'sensitive skin friendly' that just leave my skin looking worse for wear. 

If you (like me) suffer from sensitive skin the amount of ingredients that go into some skincare is alarming and quite worrying. Why do they need seven types of alcohol?! Which is why I decided to go back to basics as it were and try out the Boots Cucumber skincare range. 

I picked up the makeup wipes because, let's face it, some nights I don't want to spend 15 minutes wiping cotton pads over my face. I decided to match this with the moisturiser as my skin has decided that it'd like to become more of a combination skin type and finally the clay mask, simply because I love face masks.

Why cucumber? It's natural, refreshing and moisturising with the added bonus that it smells incredibly fresh. 

Boots Essentials Cucumber Wipes...

These are a heavenly way to remove makeup quickly and effectively. Anyone that has used Double Wear foundation will know the struggle of removing it from your skin, it almost becomes your skin it's that hard to remove. However, with these wipes foundation (even the stubborn ones) glide off. Think it as being as easy as one-two-three. 

They leave your skin with a cooling sensation that has the added benefit of smelling super fresh.

Boots Essentials Cucumber Moisturiser...

Moisturiser is something that used to scare me when my skin was at its oiliest, now my skin craves it and this one does just the job. It's cold to touch and soothes the skin once applied. You've got to wait a couple minutes before applying any makeup/primer but that's the norm with most moisturisers.

Boots Essentials Cucumber 3 Minute Clay Mask...

I love clay masks but they don't usually love me back. I honestly believe that my skin panics when a mask is put on it, it doesn't know how to react so it decides to breakout. With this mask however (touch wood) it's done the exact opposite and reduced any pesky blemishes as well as any redness. It feels like a normal clay mask and dries to a semi-hard texture that you could scrap away should you so desire. This popped on the face for 3 minutes while you make a cup of tea is perfect and a great way to end a day of wearing makeup.


Monday, 31 August 2015

Cranberry Vinaigrette

Hello Hello! 

This is the Cranberry Vinaigrette that goes with the Grilled Chicken, Pear, and Arugula Wrap.

Ingredients
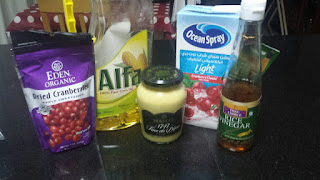
2 1/2 tablespoons frozen cranberry juice cocktail concentrate
1 tablespoon rice vinegar
1 1/2 teaspoons Dijon mustard
1 tablespoon finely chopped dried sweetened cranberries
1/8 teaspoon salt
1/8 teaspoon black pepper
1 tablespoon canola oil


Method

Combine first 6 ingredients in a bowl, stirring with a whisk until cranberry concentrate thaws. Gradually add oil, stirring with a whisk until blended.


Grilled Chicken, Pear, and Arugula Wrap with Cranberry Vinaigrette

Hello Hello!

I have done this recipe before and it tasted amazing but I forgot to take photos. Here is the second go at this, with pictures! Serves 4 (one per wrap).

Ingredients
4 chicken breasts, cut into strips
1/4 teaspoon salt
1/4 teaspoon black pepper
2 pears, quartered lengthwise and cored
Cooking spray
6 cups arugula (rocket)
Cranberry Vinaigrette
4 (8-inch) whole wheat flour tortillas


Method
Prepare grill.
Sprinkle chicken with salt and pepper. Place chicken and pear on a grill rack coated with cooking spray. Grill chicken 3 to 4 minutes on each side or until done. Grill pear 2 minutes on each side or until browned. Remove chicken and pear from grill; cut pear into 1/4-inch slices.


I cooked the chicken first so I put it in the oven (160'C/320'F)
in a tin foiled parcel to keep it warm while I cooked the pears.


Combine arugula and Cranberry Vinaigrette in a large bowl; toss well. Place about 1 cup arugula mixture on each tortilla; top evenly with chicken and pear slices. Roll up tortillas and enjoy!


You can find the original recipe here.

Thursday, 27 August 2015

Everyday Make Up

My everyday make up is kept to a minimal amount of products, it's a look that can go from start to finish in 10 minutes. It's not fancy, it's not daring but it works and lasts all day.

For the base...

I've been trying out the EstÄ“e Lauder Double Wear Maximum Cover Foundation, for the days when I'm in a hurry or feeling less than inspired, this is perfect. It covers everything (seriously, anything) and reduces the time spent applying concealer or going in for a second layer. For the most part though, I thin it out slightly with L'Oreal Infalliable Matte Foundation. The mix of both of these helps me achieve a light enough shade to match my skin as well as the perfect medium coverage.

I mix the two on the back of my hand and then buff them into my face using a Real Techniques Stippling Brush. This achieves a flawless, even cover across the entire face that photographs beautifully and hides any imperfections.

If my skin feels particularly oily I'll set it all in place with the Rimmel Stay Matte Powder in transparent.

For the eyes and eyebrows...

Eyes wise I like to keep it simple with a my-eyelashes-but-better approach. I use the Rimmel Scandal Eyes Xtreme Black mascara to separate and lengthen. Once this has dried briefly I follow it up with the Rimmel Rockin Curves mascara to add some thickness and depth.

I've recently converted back to the Benefit Brow Zings in the shade Bronzing Medium and love this stage of doing my make up. Applying the wax first over the entirety of my eyebrow and filling in any gaps/smoothing out my brow shape I follow it with the powder, creating my dream brows.


Before and After